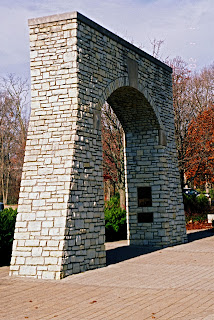
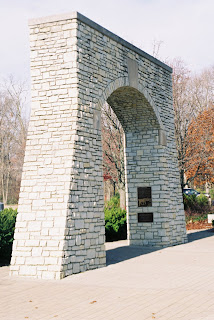
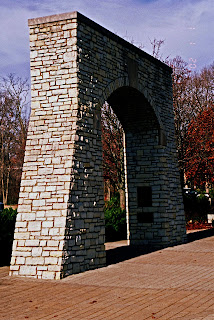
 I used a lot fewer layers in this one, and played with shadow/highlight/midtone contrast to get where I wanted. This is the sort of thing I'd do for a client, rather than an art show.
An Amateur Photo Blog, Featuring Various Pictures Of The Best Dog Ever, Plus Other Stuff.
Sunday, December 02, 2007
Here's something a little less crazy.
 I used a lot fewer layers in this one, and played with shadow/highlight/midtone contrast to get where I wanted. This is the sort of thing I'd do for a client, rather than an art show.
I can't seem to stay away from film
 Unfortunately, I don't own a really good film camera. As you can see, the one I used for this shot used center weighted metering, rendering shadow detail just fine, but blowing out everything else. Yuck. The lens is also not exceptionally sharp. Double yuck.
 So after I had my local Costco 1 Hour Photo develop, print, and scan me a Premium CD (8x12 inches, or 2400x3600 pixels. You youngsters just think 8.6 megapixels and move on), I put the image in Photoshop for some much needed loving. Here's the result, which I appear to have taken a bit far, but then, how far is too far when you're making art?
If you're wondering how to do this yourself, you can pick up a Scott Kelby book for the full scoop under "Fixing Overexposed Images", or just follow these simple steps in Photoshop Elements.
Open the image.
Drag background layer onto Create a New Layer Icon.
Change layer blend mode from Normal to Multiply.
Control-J adds new layers if you need more than one. This one has four extra.
If you need half a layer, highlight the top layer and reduce the opacity.
After doing the above, I switched to Quick Fix, bumped the shadows up 25%, knocked the highlights down 25%, increased mid tone contrast 25%, and sharpened it 25%.
I then saved it as a .jpg, which is very important. If you save it as a .psd, it will be about 109MB, vs 6.9MB.
Is it photography?
No, it's art.
Tuesday, October 30, 2007
Saturday, September 29, 2007
Todays not photoshopped.
 Direct from the camera, D40, 18-200VR at 200mm, 1/1000, f5.6, ISO 360. I was in Aperture (A) mode, ISO Auto, and Auto Contrast. As you can see, the camera likes to expose for shadows, which is unfortunate, as it lost some of the highlight detail in the middle of the picture. Other than whatever it was in the right corner, (lens flare probably, I don't use the hood) I'm still pretty happy with this image.
Sweet Fancy Moses!

 Looks like I'll be purchasing some new fingernail clippers soon. See that big nail over the broken off bit? That came from my right big toe, and is the reason that yet another pair of clippers just went to Grooming Supplies Heaven. I'm just afraid some officer of the law will see this post and insist that I register my toenail as a deadly weapon.
Saturday, September 22, 2007
Three more images and gone.


 The top two are unedited, the bottom image was hit with Picasa 2's "I'm feeling lucky" button. I really can't say enough good things about Picasa 2. For the casual user, it's a most excellent sorting and minor editing program. I don't get too terribly serious about editing, Photoshop Elements 5 is the most serious program I've got, although DXO Optics Pro is on my Christmas list, if only for the distortion/vignetting removal tool.
I prefer to get my shots as right as I can before hitting the shutter release button. Post processing is work, and I'm far too refined and civilized for that.
On the other hand...


 As exciting as those grapes are, (and small, but then, wild grapes are smaller) seeing the whole bush is kind of interesting if you get right in the middle. I had grapevine hanging down on either side of me to get that last shot.
Modern lenses focus close. Never be afraid to get right in the middle of it all.
Why you need an 18-200 VR Nikon zoom lens.

 As Ken Rockwell likes to point out, over and over, wide angle lenses are not for "getting everything in". As you can see from the top image, 18mm (27mm equiv.) is boring. Everything is too small, the detail is overwhelming. That wide angle might be useful for a family portrait or certain landscape work, but for everything else, not so much. 200mm (300mm equiv.), on the other hand, puts you right in amongst the most interesting stuff.
Just ask yourself: Which one of those two images would I like to put on my wall?
Wednesday, September 19, 2007
Photos from the Panasonic TZ3K

 Some time ago, I purchased a Pentax Optio S60 for my father in law. Of course, the S60 was a dog, and I eventually ended up returning it to Costco for a refund. My poor father in law hated that camera, although even he admitted that when it worked, it took mighty good people pictures.
Fast forward almost two years, and Panasonic releases the TZ-3K, a camera with a 10x optical zoom in a package not a whole lot bigger than the S60. It's about twice as thick, but just about the same in height/width. It's also loaded with a ton of really nice features. The Leica lens is tack sharp corner to corner and at all focal lengths except the most telephoto (and not too bad there), it's got optical image stabilization (which is superior to sensor shift stabilization), and best of all, it's dead simple to operate. The fact that it's got superior ergonomics and the controls are a lot harder to accidently shift during operation doesn't hurt a bit, either.
So I gave the father in law this new camera for his birthday, and lo, all was well with the world.
Except.
I had to try the camera out before I gave it to him, just to make sure I got a good sample, right? Good thing I did, too, because the first sample I bought had dust inside the lens assembly. This caused all sorts of focusing and metering errors, so I returned it and got another one.
The problem is, I fell in love with the darned thing, and had to buy another one for myself.
Which the wife promptly appropiated for her own use. Which is infrequent at best. Arrrrgh!
I may have to buy another one soon. As much as I absolutely love my Fuji F30, the 28-280 zoom range and optical image stabilization make the Panasonic vastly more useful.
The top photo was part of an impromptu test I ran on the pro's who use my lab. I printed that photo and two from my Canon 20D, and then asked them to pick the consumer camera photo from the lineup. Not one of them could do this.
Heh. It should have been easy enough, for anyone that understands the major differences between consumer grade cameras and DSLR's. You see, the smaller sensor in the consumer grade camera means that at any given aperture, the consumer camera will have greater depth of field. The top photo was shot at f3.3. Shoot the same aperture on almost any SLR lens you care to name, and the depth of field will be fraction of that. The front part of the step will be further out of focus, as will the wall behind. Both of the other two shots showed the shallower depth of field indicative of a good SLR lens made for pros who like to isolate their subject with shallow depth of field.
But what do I know? The pros are making a living taking pictures, and I'm still working for someone else. Therefore, they must know more than me, right?
And the second photo? Nothing special, I was just monkeying around on the backyard swing when Gunner climbed in my lap after playing in his wading pool. I used the opportunity to test the camera's macro capabilities.
Wednesday, September 12, 2007
Why you need a hot shoe flash, outdoor edition.

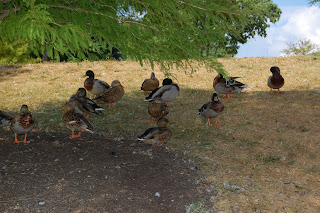
 Ah, ducks. I love ducks. Not only are they cute as all get out, melodious as can be, and very fine looking fowl, they're just darned delicious. In the top picture, they're also fairly well illuminated with a burst of flash from the SB-400 atop a D40 in Shutter priority mode. Considering how bright the day was, I needed something to illuminate them where they were resting in the shade. This is where the D40 really shines, as that 1/500 flash sync speed allows me to use flash with a wider range of outdoor conditions.
The second picture is the star of the show, of course. You'll note the lightness of the shadow compared to the bright bright bright sunlit grass. That's caused by flash, and outdoors in mixed lighting, it's a real blessing.
Why you need a hot shoe flash, indoor edition.


Both of these pictures were taken with the flash bouncing off the ceiling. See how even and diffuse the light is? I could invest in some tupperware (a plastic diffuser) and go direct flash, but why? The lighting wouldn't be any better. Diffusers are really only useful in those rare situations when I need direct flash on the subject, and then I probably wouldn't bother anyway, since Nikon's lighting is so gosh darned perfect every time.
Maybe if I was shooting a wedding, but for the moment, my wedding gear is all Canon, and I have diffusers for my 580 EX flash.
Save your money and get a flash that can be bounced off the ceiling. For Nikon, that's the SB-400, SB-600, and SB-800. For Canon, that's the 430 EX and 580 EX II. For everybody else, consult your manufacturer's website. I'm not going to post about something for which I have no experience.
Saturday, September 08, 2007
Here's why you need a DSLR.
 See how very little digital noise there is in this picture? It was taken at ISO (ASA for the old timers) 800, which is fairly high for a flash shot inside a domestic residence. My only excuse is that I just got the camera last night and was noodling around figuring out the settings.
You'd have more noise in your image (and less fine low contrast detail) at ISO 200 with most pocket cameras. The only exception is the Fuji line up to the F40fd. The F50fd is going to be worse, if the sample images I've seen are any indication.
Even with a Fuji, you would have worse illumination, as the only Fuji consumer camera with a hot shoe is the S9000/S9100fd, and those cameras suffer from the "Too Damned Many Pixels Syndrome". It's a real pity so many manufacturers are falling prey to this syndrome. Fuji used to be a real ray of hope in this hour of overcrowded photosite darkness, but it looks like their marketing department has managed to win over their design and engineering division.
Pity.
I guess my next consumer grade camera will be this Casio. 6 megapixels on a 1/1.8 sensor at 60(!) full resolution frames per second? Oh baby. I love it when Casio talks dirty.
Image quality and performance are far far far more important than total pixels.
Use your flash in daylight!

As you can see, even daylit subjects can benefit from flash. The top shot was flash off, and is rather dull and uninspiring.
The bottom shot is direct flash, and is better than basic daylight, but still rather, well, wrong. Nikon's flash exposure, as always, is excellent, but that's not the problem. The problem is that it's direct flash exposure. Yech.
The second shot, on the other hand, is bounce flash at 90 degrees, reflected off the roof over my porch. I much prefer the effect. Whenever possible, I bounce my flash, which is another reason I chose Nikon over Canon for the small carry everywhere DSLR. Nikon's SB-400 has up to 90 degrees swivel, where Canon's baby (basic) flash has no swivel. Canon has been a bit slow to respond to the two things that make Nikon such a winner in the small DSLR area: small swivel flash and the 18-200VR lens.
Had Canon yanked their head out (and come up with a decent auto ISO function) I probably would have purchased a Rebel XTI instead.


Yay! The D40 arrived.
 For various reasons, the main being that lugging a Canon 20D around is something I just won't do, I decided to go to something smaller and simpler. Behold one of the first pictures from my Nikon D40, kit lens, illuminated by 90 degree bounce flash from the incredibly tiny and capable SB-400 hot shoe flash.
Purdy, ain't it?
This is the first time I'd ever even considered taking this particular shot, and it's due to the fact that the D40, lens, and flash together weigh about the same as the 20D and 17-85 IS lens.
More to come.
Tuesday, August 28, 2007
More Film
 Here's some more shots with the Minolta. You can see some vignetting, the lens is part of the two lens kit, and even back then kit lenses were rather cheesy.
However, I did find a solution to the resolution problem. My local Costco minilab operator built up a custom scan size for me. These were scanned at 8x14 at 300 dpi, or about 7.5 megapixels.
It's a pity APS doesn't come in higher quality than the stuff Fuji puts out. You can see the film imperfections as white spots here and there.


Wednesday, August 22, 2007
Another film shot.
 And the star of the show, no less.
APS is a smaller format than 35mm, and a different aspect ratio, to boot. 7:4 vs 3:2. That is, for every 7mm on the long side, it is 4mm on the short side, where 35mm is 3mm on the long side for every 2mm on the short side. Too bad the chuckleheads designing the stuff didn't go the other way, toward a more square format, like 4:3, or even 1:1. Those look better for portraits, and that's what most APS film was used for. Landscapes look better in a longer format, but APS is too small to capture the amount of detail you need for a good landscape shot.
That problem might be a alleviated a bit by the availability of a higher resolution scan, but most minilabs (1 Hour Photos) offer only the 4x7 or 1200x2100 pixel scan.
Pity, that.
If anyone has a solution to that which does not involve me buying thousands of dollars worth of equipment, let me know in the comments.
Tuesday, August 21, 2007
Try some film.


 These are all from an old Minolta APS film SLR I picked up recently for chump change. Good stuff, if you like film, which I don't, particularly. But shooting with a film SLR forces a change in the photographer's perspective. For me, that manifests as more thoughtful shots, with more attention paid to composition. After all, I've only got 25 shots to the roll to get it right.
Tuesday, July 31, 2007
Is photography art?
Zoom with your feet.
This tower fascinates me.
More Fuji S6000fd output.
Subscribe to:
Comments (Atom)
Followers
Blog Archive
-
▼
2007
(25)
-
►
September
(11)
- Todays not photoshopped.
- Sweet Fancy Moses!
- Three more images and gone.
- On the other hand...
- Why you need an 18-200 VR Nikon zoom lens.
- Photos from the Panasonic TZ3K
- Why you need a hot shoe flash, outdoor edition.
- Why you need a hot shoe flash, indoor edition.
- Here's why you need a DSLR.
- Use your flash in daylight!
- Yay! The D40 arrived.
-
►
September
(11)


